Introduction
What is SSO ?:
Single sign-on (SSO) is an authentication process that allows a user to access multiple applications with one set of login credentials.
This guide helps you to implement the single sign-on (SSO) using custom token-based authentication, this will results in a user being able to log in to Helical Insight application based on a shared login mechanism and ID.
If you have an application or portal you want to use with Helical Insight application having no single sign-on environment, you can use the Helical Insight token-based authentication and user management framework. To work with token-based authentication, your application or portal must do the following:
- Authenticate the end user according to the standards of your environment or application.
- Encrypt a token based on authenticated user values within your application or process. The token values can include username, organization (if multi-tenancy is enabled), roles, and profile attributes. You can configure the token based on your needs for reporting and analysis within the Helical Insight application.
- Send the token to the Helical Insight as a part of the HTTP request.
When Helical Insight Receives the token, it will:
- Attempt to decrypt the token (if encrypted) and validate the token format
- If the token is successfully parsed, use the information in the token to create and update the external user within Helical Insight application.
Overview of Token-Based Authentication
This section explains how Helical Insight performs external authentication using a token.
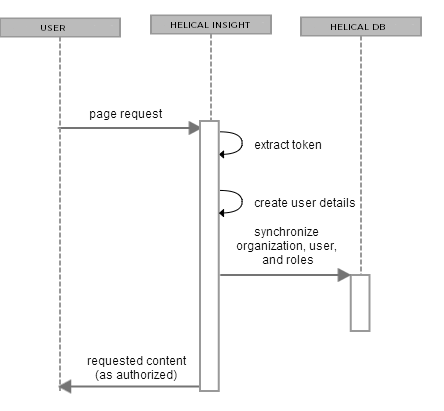
The following diagram shows the general steps involved in logging into Helical Insight Server using a token:

The following steps explain the interaction between the user’s browser, Helical Insight, and a pre-authenticated user:
- A user requests any page in Helical Insight Server.
- If the user has not previously accessed Helical Insight, the server looks for the URL Parameter. If the token is present and correctly formatted, the user is automatically authenticated.
- Helical Insight Server decrypts the token in the URL or request header and username, roles, and organization information are extracted from the token and synchronized with the internal database. The helical Insight reflects the user’s roles and organization as defined in the token.
- As with the default internal authorization, Helical Insight now sends the requested content to the user and application-server user session is established and the connection between the requesting browser or process is maintained by repeatedly sending session identification information, usually in the form of an HTTP cookie. The token doesn’t need to be resent until the user logs out or the session is inactive for a period of time.
Configuring Helical Insight for Token-based Authentication
Required files for custom Token-based Authentication are as below:
- Encryption-Decryption.jar
- SSOEncryptionDecryption.zip -> This file helps you to refer the java source code which is used for encrypting the token.
Click here to download the above mentioned files
To configure Helical Insight to work with your authentication method, modify and deploy the sample configuration file which you can find at the below location:
Location: C:\Helical Insight\apache-tomcat-7\webapps\hi\WEB-INF\classes
This property file contains the default properties required for the token based authentication. We can change the default properties by editing the customAuthentication.properties file. Content of the property file is as below:
cipherAlgorithm = AES
cipherMode = ECB
cipherPadding = PKCS5Padding
cipherKey = HSpnzzfCLqrBn8Lk
defaultRole = ROLE_USER
defaultTimezone = IST
defaultCompany = HelicalInsight
defaultEmail = user@helicalinsight.com
Note: If you are directly implementing the above algorithm in your programs please make sure that you take care of special characters by using encodeBase64URLSafeString. Once the token is generated it should run through encodeBase64URLSafeString so that it replaces the special characters with appropriate replacement characters. In the later part of the blog we are providing the SSO encryption code for Java, one of the files is “SSOEncryptionDecryption.zip” and when you unzip it has this file called “CiperUtils.java” (inside the zip its at the location (..SSOEncryptionDecryption\SSO-Testing\src\com\helicaltech\encryption). This is java source code which does the encryption using the same algorithm. In this file you can actually check the line number 33 wherein we are doing the URLSafeString which is mentioned earlier.
Information about the SSO Token
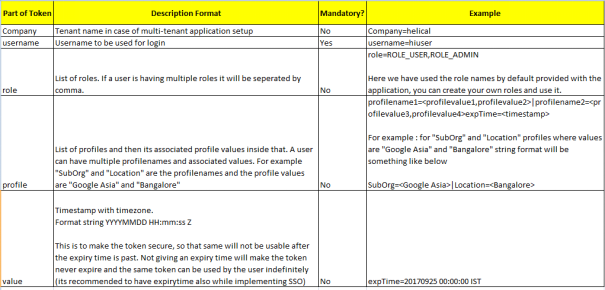
- username – loggedInUsername (mandatory parameter in the token generation)
- Company-
- if Company is not provided in the token, user will be created with the default Company provided in the properties file.
- if Company is provide while token generation , Company will be created in the DB , by default Role REPORT_USER mapped with given Company name and user will be created in that Company and Default Role REPORT_USER will be assigned to that user
- role: we can assign multiple roles separated by comma. By default ROLE_USER will be assigned to loggedInUser
- expTime –
- Optional parameter in the token
- If provided in the token , the token will be valid up to the date and time provided
- if zone is not provided in the token , by default it will take Indian Standard timezone (UTC+05:30)
-
- The spring-security.xml is inside Helical Insight classes folder
Location: C:\Helical Insight\apache-tomcat-7\webapps\hi\WEB-INF\classes
Make the following modifications in spring-security.xml file:
-
-
- comment out the following line (the line number may change based on version you are using in HI4.1GA it would be line 288 in HI 5.0 it would be line 290.) as shown in the image below.
<custom-filter before="CAS_FILTER" ref="authenticationProcessingFilter"/>
to<!-- <custom-filter before="CAS_FILTER" ref="authenticationProcessingFilter"/> -->
- comment out the following line (the line number may change based on version you are using in HI4.1GA it would be line 288 in HI 5.0 it would be line 290.) as shown in the image below.
-
-
-
- remove the comment from the following line (the line number may change based on version you are using in HI4.1GA it would be line 292 in HI 5.0 it would be line 294.) as shown in the image above.
<!-- <custom-filter before="CAS_FILTER" ref="customAuthenticationFilter"/>-->
to<custom-filter before="CAS_FILTER" ref="customAuthenticationFilter"/>
- Remove comments from the following lines number (the line number may change based on version you are using in HI4.1GA it would be line 415 to 434 in HI 5.0 it would be line 417 to 436.) as shown in the image below.
From<!-- <beans:bean id="customAuthenticationFilter" class="com.helicalinsight.admin.customauth.CustomAuthenticationFilter" parent="authenticationProcessingFilter"> <beans:property name="authenticationManager" ref="authenticationManager"> </beans:property> <beans:property name="authenticationFailureUrl" value="/login.html?error=1"/> <beans:property name="excludeUrls"> <beans:list> <beans:value>/j_spring_switch_user</beans:value> </beans:list> </beans:property> </beans:bean> <beans:bean id="customUserDetailService" class="com.helicalinsight.admin.customauth.CustomUserDetailService"> <beans:property name="roleService" ref="roleServiceImpl"/> <beans:property name="userService" ref="userDetailsService"/> <beans:property name="organizationService" ref="organizationServiceImpl"/> <beans:property name="profileService" ref="profileServiceImpl"/> <beans:property name="namesConfigurer" ref="applicationDefaultUserAndRoleNamesConfigurer"/> </beans:bean>-->to<beans:bean id="customAuthenticationFilter" class="com.helicalinsight.admin.customauth.CustomAuthenticationFilter" parent="authenticationProcessingFilter"> <beans:property name="authenticationManager" ref="authenticationManager"> </beans:property> <beans:property name="authenticationFailureUrl" value="/login.html?error=1"/> <beans:property name="excludeUrls"> <beans:list> <beans:value>/j_spring_switch_user</beans:value> </beans:list> </beans:property> </beans:bean> <beans:bean id="customUserDetailService" class="com.helicalinsight.admin.customauth.CustomUserDetailService"> <beans:property name="roleService" ref="roleServiceImpl"/> <beans:property name="userService" ref="userDetailsService"/> <beans:property name="organizationService" ref="organizationServiceImpl"/> <beans:property name="profileService" ref="profileServiceImpl"/> <beans:property name="namesConfigurer" ref="applicationDefaultUserAndRoleNamesConfigurer"/> </beans:bean>
- remove the comment from the following line (the line number may change based on version you are using in HI4.1GA it would be line 292 in HI 5.0 it would be line 294.) as shown in the image above.
-
- Save the file and restart the Helical Insight Application Service.
- Generate the authentication token for the SSO, to generate the token we require the executable Encryption-Decryption.jar. Now put this jar at any location for the token generation.
Token generation format is provided below
Token Format :
Company=<tenant_name>|username=<username>|role=<role1,role2..>|profilename1=<profilevalue1,profilevalue2>|profilename2=<profilevalue3,profilevalue4>expTime=<timestamp>
Token comprises of 4 parts separated by a “|” (pipe separator).

Token Generation steps-
-
- Execute the Encryption-Decryption.jar file present on your server.
Example : java -jar Encryption-Decryption.jar “Company=helical|username=hiuser|expTime=20190925 00:00:00 IST”
-
- After execution it provides the Encrypted token which will be used for SSO
Encrypted String ::wjfSbnPF-lPluF30RJVOS6MONd-Q5_qZ0sxO-ga6YSV-RW6zSojtIhOQUzhVC0GDGRkj3FP-vQ98Hg9hY2DPbg
- Now Pass the encrypted string to the application URL for SSO
Example:
http://localhost:8085/hi-ee/welcome.html?authToken=wjfSbnPF-lPluF30RJVOS6MONd-Q5_qZ0sxO-ga6YSV-RW6zSojtIhOQUzhVC0GDGRkj3FP-vQ98Hg9hY2DPbg
Few Examples of Token Generation:
-
- Token Generation with Username
java -jar Encryption-Decryption.jar “username=hiuser|expTime=20190925 00:00:00 IST”
Encrypted String ::ow4135Dn-pnSzE76BrphJX5FbrNKiO0iE5BTOFULQYMZGSPcU_69D3weD2FjYM9u
Example: http://localhost:8085/hi-ee/welcome.html?authToken=ow4135Dn-pnSzE76BrphJX5FbrNKiO0iE5BTOFULQYMZGSPcU_69D3weD2FjYM9u
-
- Token Generation with Company and Username
java -jar Encryption-Decryption.jar “Company=ABC|username=hiuser|expTime=20190925 00:00:00 IST”
Encrypted String ::H_0dH9Uce2BXIVZFX1a9-hhcvCYZA2sY94j0aCG0dZ8tjgEuQUijYIidnNp-qpy0uS9GataLMGKkmosebf0r4Q
Example: http://localhost:8085/hi-ee/welcome.html?authToken=H_0dH9Uce2BXIVZFX1a9-hhcvCYZA2sY94j0aCG0dZ8tjgEuQUijYIidnNp-qpy0uS9GataLMGKkmosebf0r4Q
-
- Token Generation with Company, Username and Role
java -jar Encryption-Decryption.jar “Company=ABC|username=hiuser|role=ROLE_USER|expTime=20190925 00:00:00 IST”
Encrypted String ::H_0dH9Uce2BXIVZFX1a9-vM4F7qEQ8EKFDK9-rGa_x0S74hKdN5p6OeW7uzQ3Llot0ecIVqd4qG5DyyTVQOCKQuygEU83qiqir_t97U5mSo
Example: http://localhost:8085/hi-ee/welcome.html?authToken=H_0dH9Uce2BXIVZFX1a9-vM4F7qEQ8EKFDK9-rGa_x0S74hKdN5p6OeW7uzQ3Llot0ecIVqd4qG5DyyTVQOCKQuygEU83qiqir_t97U5mSo
-
- Token generated with username and expiry time with IST timezone
java -jar Encryption-Decryption.jar "username=usertest1|expTime=20230704 14:59:00 IST"
http://localhost:8085/bi-ee?authToken=0-RBzumNxRF-AuxJFBIIcvwpiblaj_7KcJc3Eu4bNGYPsmycnWxPzJHHRIOE7NBNeKTQjq1f6X13iCt061TZeA
-
- Token generated with username and expirty time with some other timezone like UTC
java -jar Encryption-Decryption.jar "username=usertest1|expTime=20230704 09:36:00 UTC"
http://localhost:8085/bi-ee?authToken=0-RBzumNxRF-AuxJFBIIcvwpiblaj_7KcJc3Eu4bNGb3sNQtIm6_40l1NVIEbEoOeKTQjq1f6X13iCt061TZeA
This will create user with hiuser in ABC organization with role ROLE_USER assigned to it.
Accessing Report Through Token
Same token can be used to directly redirect to the report also, we just need to pass the dir and file name of the report with the token.
Before accessing the any report that report with its metadata/datasource and its associated folder should be shared with that user/role/organization.
http://localhost:8085/hi-ee/hi.html?authToken=wjfSbnPF-lPluF30RJVOS6MONd-Q5_qZ0sxO-ga6YSV-RW6zSojtIhOQUzhVC0GDGRkj3FP-vQ98Hg9hY2DPbg&dir=1500037259760/1500037433046&file=perfect.report
In above url:
dir=1500037259760/1500037433046 : specifies the report location in the Helical Insight repository.

file=perfectstore.efw : created report name.
Note: In this blog, we have only covered the steps which needs to be performed on Helical Insight application level. Now, there are also a few steps which you need to perform at your application level like how to create an encrypted token and passing to Helical Insight application. Please refer SSO Token Requirements in order to understand how this can be done.
Note 2: We should always keep in mind that there is a limit of characters in URL. Hence with the application name + report name + token the character limit should not cross character limit. In cases if we are passing a lot of roles and a lot of profilesnames (and profile values to those profilenames) then the token length will also increase. So we should be very careful while doing the same and create hierarchy or mapping to avoid such limit.
Note 3: There could be two ways of user creation i.e. one is via Helical Insight user role management UI. The second is via SSO code. A user who is already created from the user role management UI you can not create a token for that specific user and create a session. That means a user like hiadmin, hiuser etc who has already been created from the user role management a token can not be created for them and passed in the URL to create a session for them.


