NOTE: This blog is relevant to version 3.0, 3.1, 4.0 and 4.1 of Helical Insight and will not work for any other version. You can know the version from the bottom left (above file browser) or from the admin page.
This article briefs you about how you can completely white label and change the look and feel of Helical Insight as per your own requirement. Unlike other tools, we provide extensive white labeling capabilities which includes a header, footer, login page, log-out page, context menu, file browser, repository and any other functionality as well.
With Helical Insight it is even possible to have organization specific/user specific/role specific white labeling which means the solution will identify who has logged in and based on that every person can have their own completely customized Helical Insight.
Complete white labeling in Helical Insight Application. Change the look and feel of Helical Insight as per your own requirement
Below we have described the steps in details for one of the sample use case of white labeling Helical Insight application, referring this one can white label Helical Insight application according to requirement. Please Download the attachment contains the sample files.
- In order to replace the favicon of Helical Insight application with your own favicon, add a favicon in images folder located at hi\apache-tomcat-7\webapps\hi-ee\images.
- In order to replace the Helical Insight logo and background image (which appears on the login page), add your own company logo and background image in images folder located at hi\apache-tomcat-7\webapps\hi-ee\images . You can keep any names of these image files as per your choice.
- In order to make any styles related changes create one CSS file with name as “customized-css.css”, we have provided one sample in the attachment. In this file you can define any CSS property in order to change the look and feel of the application like changing the background color, removing header and footer etc. Once the file is created deploy it inside hi\apache-tomcat-7\webapps\hi-ee\css
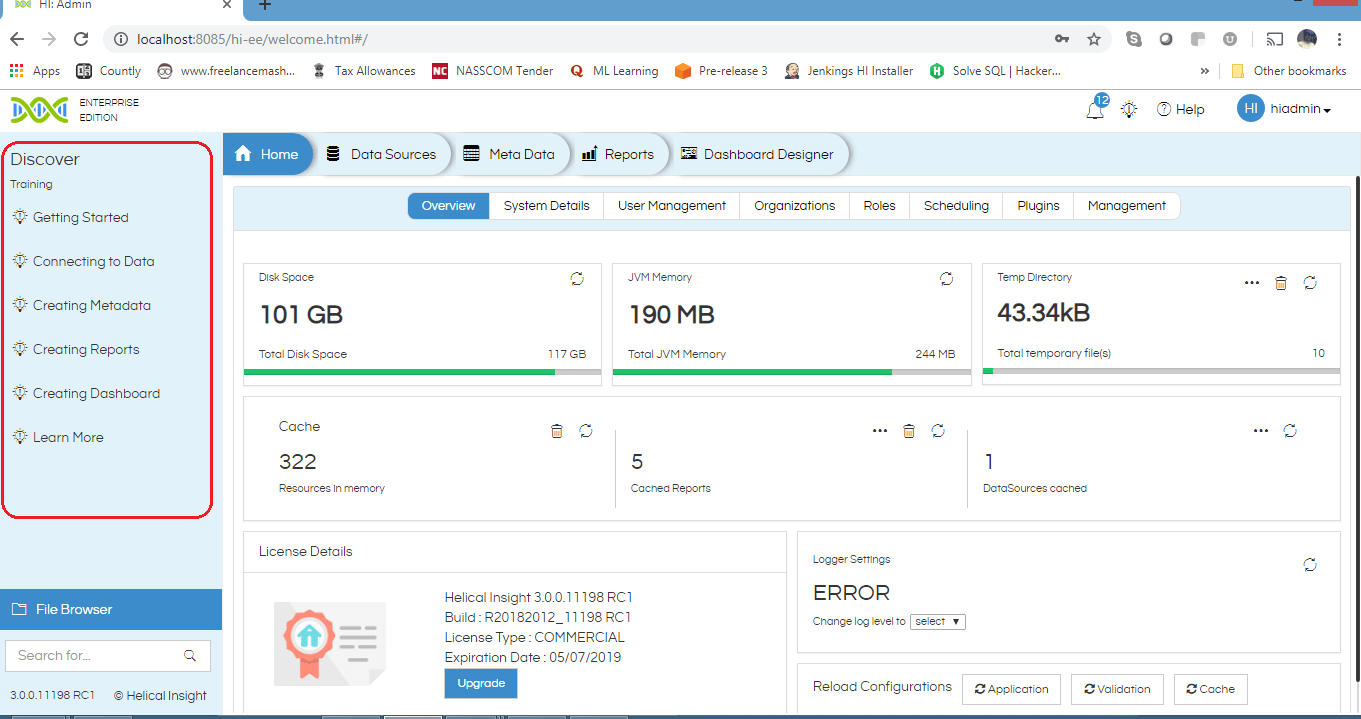
- In order to remove the left side part of Discover and it’s relevant links, as shown in the below image add the code in the file style.css
-
- By default title appears as HI. In order to change the title across all the pages to something else take the backup and then replace the base-template.jsp file located at hi\apache-tomcat-7\webapps\hi-ee\WEB-INF\pages\templates with the sample base-template.jsp file provided along with attachment. Now open the base-template.jsp file in any text editor. Change the default name XYZ Server of title with the name of your choice.
- Take the backup and then replace the tiles-definitions.xml file located at hi\apache-tomcat-7\webapps\hi-ee\WEB-INF\classes with the sample tiles-definitions.xml file provided along with attachment. Now open this file in any text editor. Change the default XYZ Server : Login with your title.
Example :
<title>XYZ Server: <tiles:insertAttribute name="title"/></title>
Save the file and close it.
- In order to change header across all the pages take the backup of jsp file located at hi\apache-tomcat-7\webapps\hi-ee\WEB-INF\pages\sections and replace it with header.jsp provided along with the attachment. Now open this file in any text editor. Change the name of an image with your logo image which you have added inside images folder.
- Add the configuration inside jsp and loginBody.jsp for customized-css.css which you have added inside CSS folder in order to use the styles written inside customized-css.css file.
- After applying all these changes, restart the application server.
Note: In images folder favicon.ico file will be already present. Replace it with your own favicon but keep the name same as favicon.ico
Note: Take a backup of a loginBody.jsp file located at hi\apache-tomcat-7\webapps\hi-ee\WEB-INF\jsp\login and replace it with the updated file provided inside the attachment. Now open the loginBody.jsp file in any text editor. Change the default names of image files with the name of image files which you have added inside images folder.
Example :
<div class="navbar-header">

<a class="navbar-brand" href="#"><img style="height: 28px;" src="${baseURL}/images/logo-xyz.png"></a>

</div>

<div class="col-md-9 col-sm-12 col-xs-12 nopad login-placeholder">

<img src="${baseURL}/images/xyz-bg.png" class="img-responsive">

</div>
Save the file and close it.
See the screenshot below in order to check the default login page and login page after applying the changes.
Default Login page :
Login page after applying the changes :
.sidebar-inner{display: none !important}
Example :
<put-attribute name="title" value="XYZ Server: Login" type="string"/>
Example :
<a class="navbar-brand" href="${baseURL}/"><img style="height: 28px;" src="${baseURL}/images/logo-xyz.png"> <span>Enterprise <br> Edition</span></a>
Example :
<link rel="stylesheet" href="${baseURL}/css/customized-css.css">
Note:It is already added for the files which are provided inside attachment.
See the screenshot below in order to check the default Admin page and Admin page after applying the changes.
Default admin page :
Admin page after applying changes :


